

Issue description
When you calibrate xTool M2 using the laser module or inkjet module, the system performs Z-axis calibration first. During the Z-axis calibration, the following issues may occur:
- Z-axis calibration failed, and an error message appears in the software.
- The Z-axis does not move up and down properly, or the probing motion is jerky.
- During calibration, the laser module or inkjet module makes accidental contact with the baseplate.
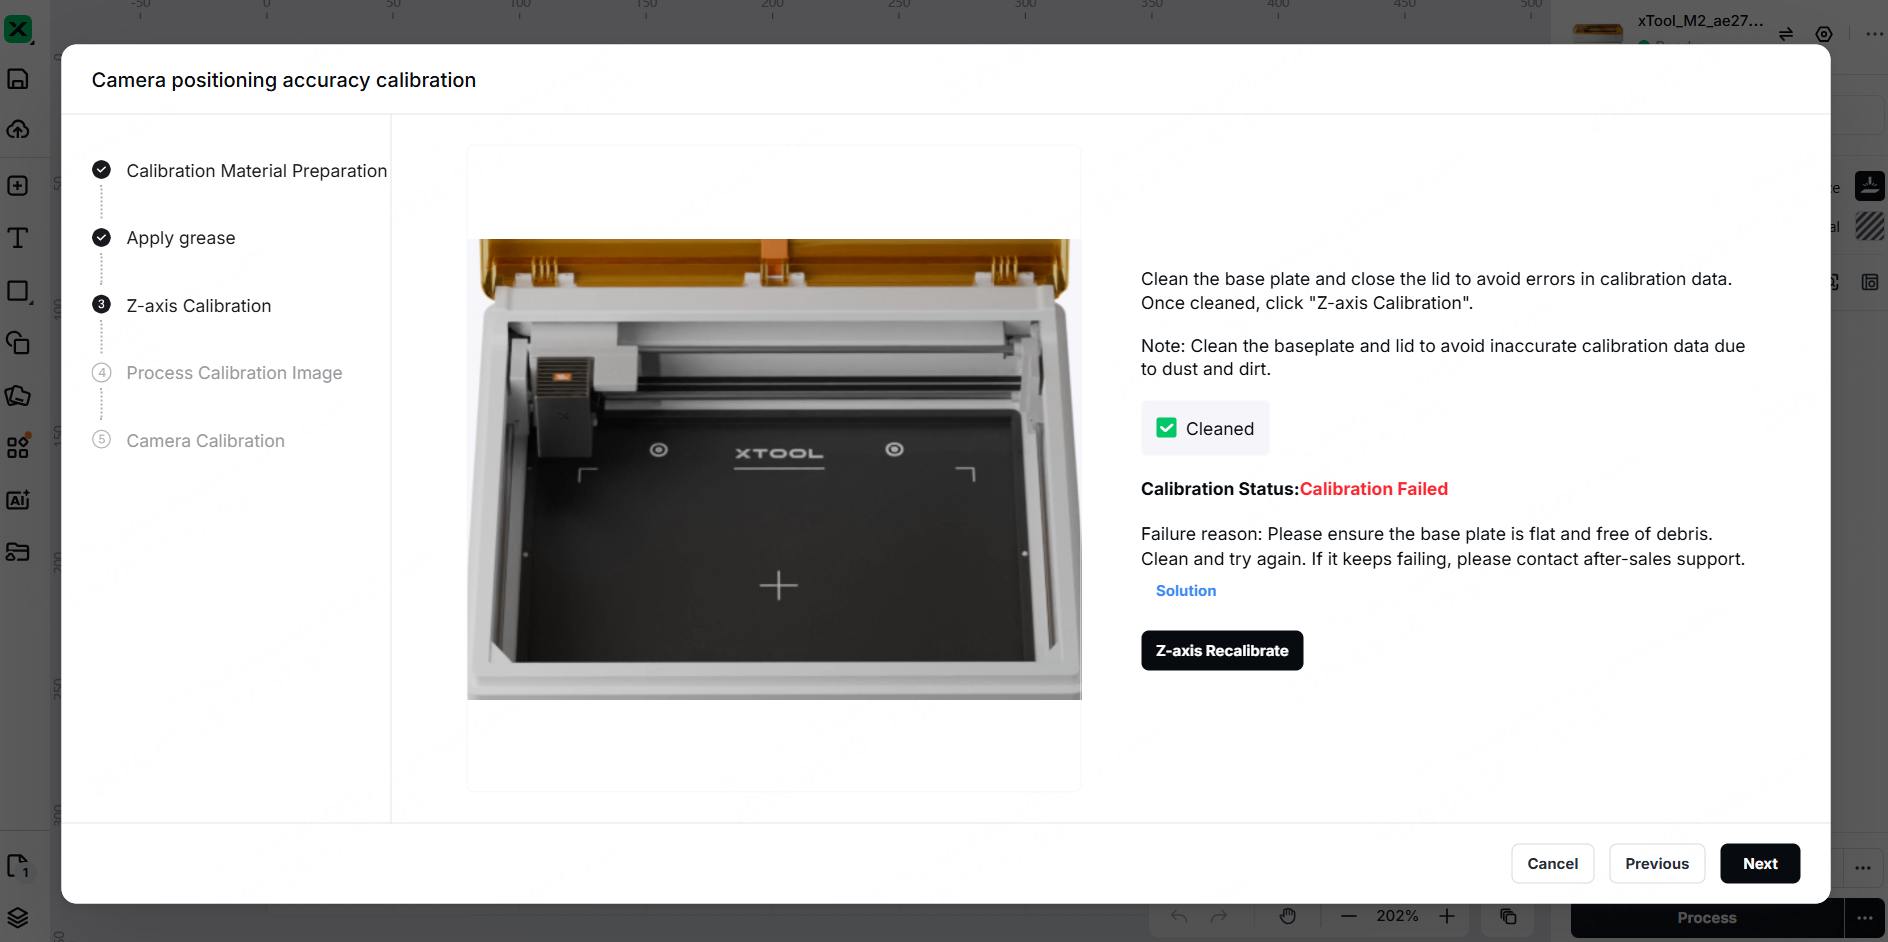
If Error Code 100001 occurs, the software prompts you to lubricate the Z-axis. Click View maintenance tutorial to see the maintenance tutorial.
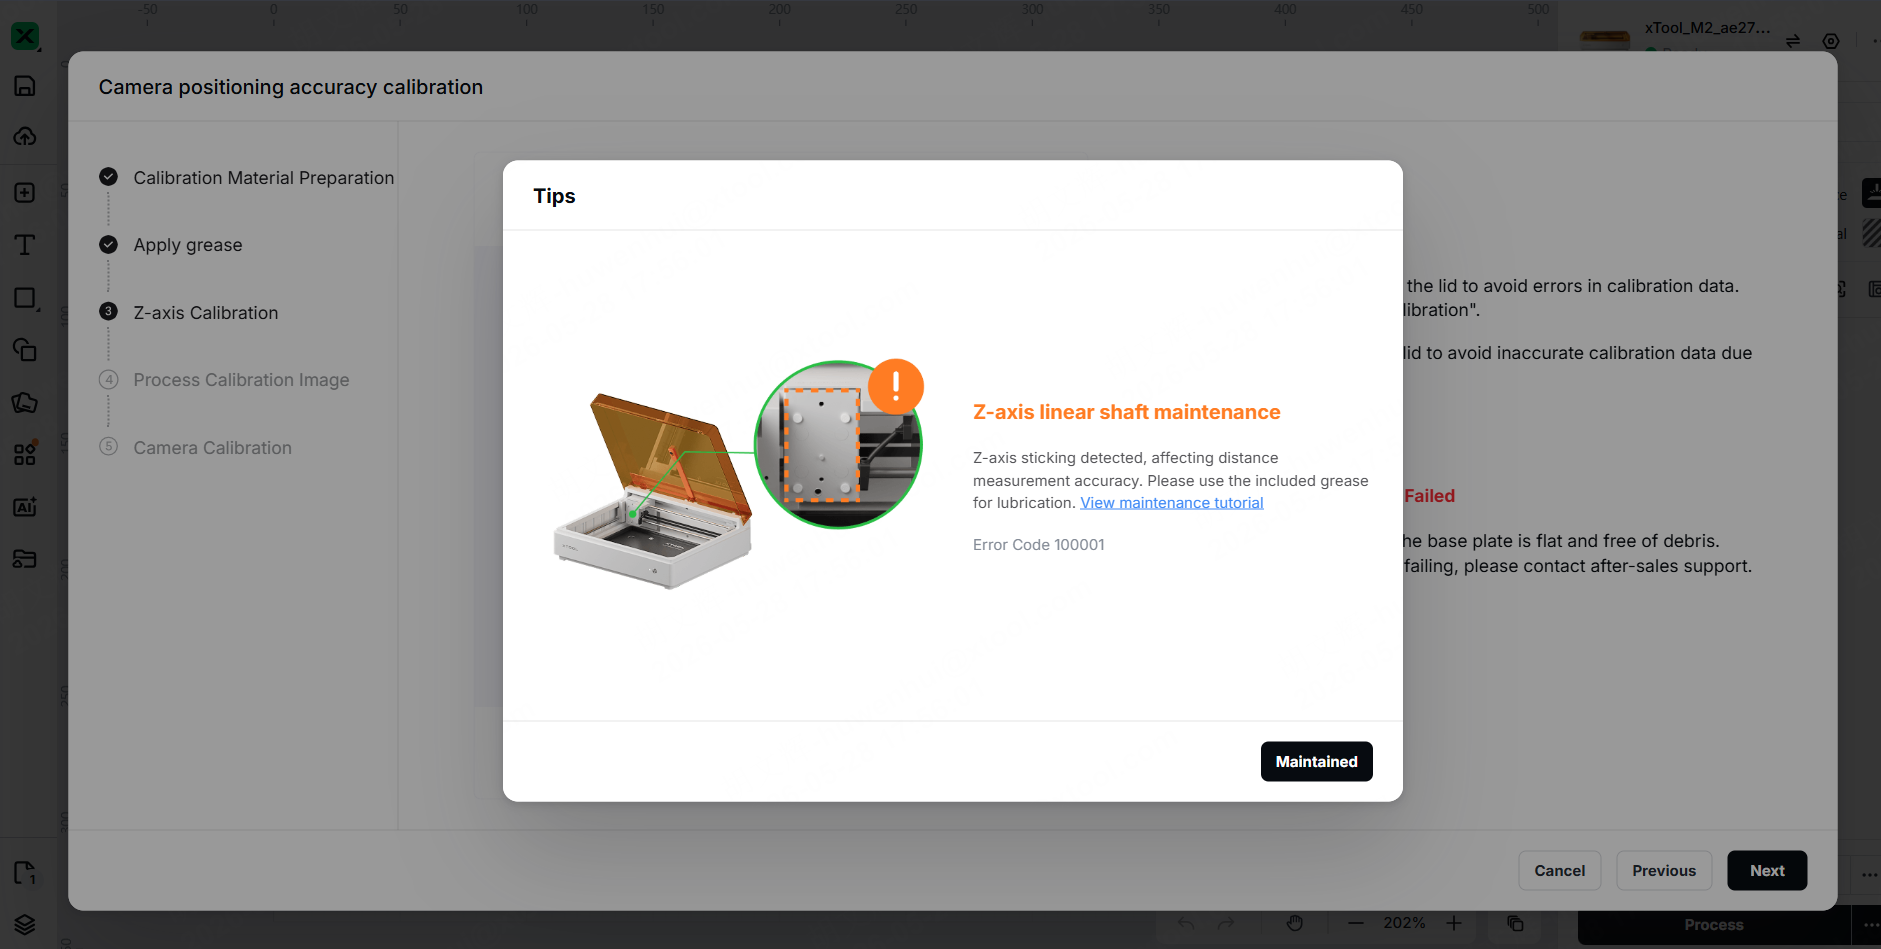
Possible causes
- The baseplate is uneven. If the height difference exceeds 2 mm, the baseplate must be replaced.
- Stuck on the module holder plate due to insufficient grease
- Abnormal spring assembly inside the module holder plate
- The laser module nozzle is stuck.
- Misalignment of the nozzle and sensor during shipping
Troubleshooting procedures
1. Check the flatness of the baseplate
(1) Turn off the device, open the lid. Clean any dust, debris, and residue on the baseplate.
(2) Check the baseplate for any noticeable dents, warping, or deformation.
A simple test method: Place a flat sheet of A4 paper in the center and corners of the baseplate to observe the fit of the paper to the baseplate. If the paper is noticeably overhanging or does not lie flat in any area, it indicates that the surface is uneven in that area.
If you find that the baseplate is uneven,
- Slight unevenness: You can place flat sheets (such as thin metal sheets) under the baseplate to level it out.
- Severe unevenness (height difference exceeding 2 mm): It is recommended to purchase a new xTool M2 baseplate directly from the official website.
- Temporary solution: You can place the material on a relatively flat surface for processing.
(3) After confirming that the baseplate is level, perform the Z-axis calibration again to check whether the error message disappears.
2. Check and maintain the module holder plate
Note: If you have already applied grease following the video tutorial, please skip this step.
- Check the module holder plate
- Keep the device powered on and remove the laser module.
- Pull the module holder plate down slightly.
- Hold the bottom of the module holder plate with your finger, gently push it upward, then let go (be careful not to apply too much force).
- If the module holder plate is observed to return to its original position on its own, there are no obvious abnormalities in the slider mechanism. Otherwise, there is a problem with the plate getting stuck.
- Maintain the module holder plate
You can refer to the video tutorial.
- Power off the device, and move the laser module to the bottom-right of the device.
- Find the grease in the toolbox of xTool M2.
- Apply grease evenly to the linear shafts at the two locations shown in the figure below. After applying the grease, slide the module holder plate up and down by hand to ensure the grease is evenly distributed.
After the lubricating, perform the Z-axis calibration again. Check whether the error code has been solved.
3. Check the retraction on the nozzle of the laser module
(1) Power off the device.
(2) Find the nozzle of the laser module (under the laser module).
(3) Gently press the nozzle with your finger to check whether it retracts and extends smoothly. Normally, the nozzle should extend and return to its original position automatically after being pressed.
- If the nozzle does not retract automatically: Please press the nozzle several times (about 10–20 times) to restore its retraction through repeated mechanical movement.
- If the nozzle does not restore after several presses, proceed to Step 2.
4. Check whether the nozzle is dirty
(1) If the air nozzle can extend and retract but automatic measurement still fails, or if there are visible stains on the surface of the air nozzle, remove the air nozzle and clean it.
(2) Use the hex screwdriver included in the packaging to loosen the air nozzle mounting screw, then carefully remove the air nozzle.
(3) Clean the nozzle:
- See the cleaning video.
- Use a clean, lint-free cloth or cotton swab, apply a small amount of anhydrous alcohol, and gently wipe the surface of the nozzle to remove any dust, glue, or smoky residue.
- If necessary, rinse the nozzle with clean water and then dry it thoroughly.
(4) Reinstall the cleaned nozzle in its position, ensuring it is securely installed.
(5) After cleaning, retest the automatic measurement function. If the problem persists, proceed to the next step.
5. Adjust the position of the nozzle
You can refer to the video tutorial.
Or you can follow the steps below:
(1) Power off the power supply.
(2) Find the mounting screws on the back of the laser module.
(3) Use a suitable screwdriver to slightly loosen the mounting screws on the back of the laser module (do not remove them completely).
(4) Move the nozzle away from the Hall sensor on the laser module (see the direction of the arrow below).
(5) After adjusting the position, retighten the mounting screws.
(6) Restart the device, run the automatic measurement function, and check whether the error code is resolved.
6. Adjust the Hall sensor of the laser module
Hall sensors are used for detection inside the laser module. The Hall sensor with mounting screws may become loose during shipping, which may lead to Z-axis distance measurement issues.
- Adjust the Hall sensor sub-board
Refer to the video tutorial (0:00-0:30).
Please use the hex screwdriver provided with xTool M2 to gently tap the Hall sensor sub-board in this location on the laser module. This will help guide the Hall sensor back into the correct position.
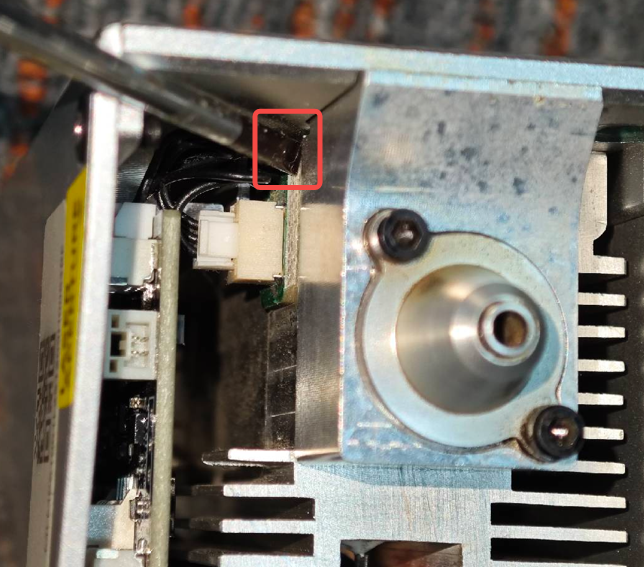
If the problem persists after applying the solution, please proceed to the "reinstall the Hall sensor sub-board".
- Reinstall the Hall sensor sub-board
Refer to the video tutorial (0:30-3:00).
Or you can follow the steps below:
(1) Power off the power supply. Remove the laser module from xTool M2.
(2) Remove the screws on both sides of the laser module and remove the housing.
Left screw on the laser module
Right screw on the laser module
Remove the housing
(3) Use a heat gun to blow air onto the sticker for 1–2 minutes to soften the adhesive backing. You can also use a household hair dryer (set to the highest level) instead of a heat gun.
Note: Maintain a safe distance during heating to prevent overheating and damage to the laser module housing.
(4) After heating, gently peel off the sticker from the laser module.
If you do not have a heat gun or hair dryer but are recommended to use this solution, please contact the xTool after-sales team for further assistance.
(5) Find the four screws on the back of the laser module (as below). Use a screwdriver to remove them.
(6) After removing the screws, carefully remove the entire laser module housing to expose the internal circuit board.
(7) Locate the Hall sensor sub-board inside the laser module (as shown).
(8) Check and adjust the sub-board:
- Check whether the sub-board is tilted.
- If the sub-board becomes misaligned or shifts out of place, remove the mounting screws from the Hall sensor.
- Readjust the position of the sub-board to ensure it is properly installed and not tilted.
c. Tighten the mounting screws to secure the sub-board.
- Check whether the screws are loose.
If the sub-board is in the correct position but the mounting screws are loose, use a screwdriver to tighten them.
(9) Carefully reinstall the laser module housing in its original position, tighten the four mounting screws on the back, and ensure the housing is securely installed.
(10) Reattach the sticker that you previously removed.
(11) Reinstall the laser module on the device, restart the device, perform a Z-axis calibration, and check whether the error code is disappeared.
7. Export the logs and contact xTool after-sales team
If the Z-axis reset still fails after completing all of the above steps, please contact the xTool after-sales team and provide a video of the issue and the work log.