

Issue description
When performing camera calibration on xTool M2, the laser module normally engraves a series of calibration dots (typically on A3 paper). However, after clicking the Calibrate button, the calibration process fails, and a pop-up window appears on the software displaying the error message "Calibration Failed" (Error Code -501).
Possible causes
- The dot pattern is unclear or smudged, making it unrecognizable by the camera.
- The calibration paper is not flat.
- The calibration is unstable, and the calibration conditions change due to slight movement of the paper, changes in light or vibration of the device, and the complete process needs to be re-executed.
Troubleshooting procedures
1. Restart the device
(1) Turn off the power supply of the device and wait about 10 seconds.
(2) Turn the device on and wait for it to finish initializing.
(3) Restart the xTool Studio software.
Important notes:
After restarting the software, there is no need to process the calibration file again.
Click Calibrate directly, and observe whether the calibration succeeds.
- If calibration is successful after a restart, it means that the failure was likely caused by a temporary software or communication issue.
- If the problem persists, proceed to the next steps.
2. Clean the distant-view and close-view cameras
Contaminated cameras are one of the most common causes of calibration failure. Follow the steps below to clean the cameras:
(1) Power off the device to ensure safe operation.
(2) Locate the distant-view camera (typically located at the top of the device) and the close-view camera (located on the side of the module).
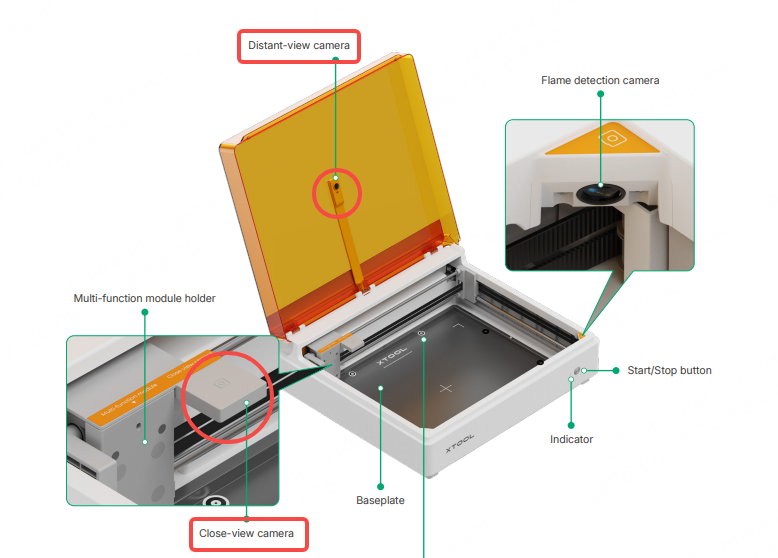
(3) Use a lint-free cloth or a dedicated camera cleaning cloth to gently wipe the surfaces.
(4) If stubborn stains remain, lightly moisten the cloth with a small amount of anhydrous alcohol (95% concentration or higher) and gently wipe them. Then use a dry lint-free cloth to dry them.
(5) Wait until the cameras are completely dry, power the device back on, and try the calibration process again.
Note: Do not use tissues or abrasive fabrics to clean, as they may scratch the surfaces.
3. Check the grid dots in laser engraving
Observe the dot patterns produced by the laser module to ensure that each dot is clearly visible, has intact edges, and is free of smoke stains or smudges.
- If the dot patterns are clear and have good contrast, you can proceed directly to Step 5.
- If the dot patterns are unclear, smudged, or have insufficient contrast, proceed to Step 4.
4. Check the A3 paper
(1) Check whether the A3 paper placed in the processing area is completely flat, with no creases, warping edges, or air bubbles.
(2) If the paper is not lying flat, please reposition it:
- Use masking tape to secure the paper, ensuring it lies flat against the baseplate.
- If the paper is smoked or stained, it is recommended to replace it with a new one.
- Repeat the calibration operation.
5. Exclude external factors that cause unstable calibration results
During the calibration, ensure that the following conditions remain stable:
- Avoid touching the device or the paper: Do not touch the device, the working table, or the paper during calibration. Make sure the A3 marking paper is firmly secured in place.
- Keep the ambient light stable: Avoid direct exposure to bright light on the processing area. Turn off any flickering lights nearby or use curtains to block out sunlight.
- Prevent device vibration: Ensure the device is placed on a stable work surface and keep it away from vibration (such as washing machines, air conditioner outdoor units, large fans, etc.).
6. Perform the manual calibration
If the software continues to report a calibration failure after multiple automatic calibrations, you can click Manual Calibration and follow the step-by-step instructions to perform the manual calibration.